Sunday, February 14, 2016

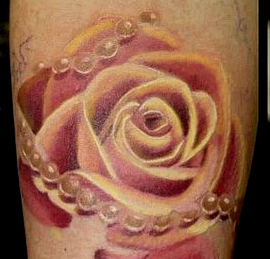
Beautiful Realistic Rose Tattoo's

So....I swore I would never get a tattoo.....
Then.....
They came up with this awesome technique of not using that big black outline!!!
They are called no line watercolor tattoo's

The tattoo process remains the same, same techniques and tools are used but the focus is on simulating the watercolor effect. 


The watercolor style is created using splatters, blurs, shades. 

There are no defined shapes and no outlines, watercolor tattoos allowing the artist to take on a different approach to the “traditional” tattoo.

Here are just some of the designs I am considering....


A traditional tattoo will outlast a watercolor one, but eventually even the traditional tattoo will need a touch up as well. 

No matter what tattoo you want, you’ll probably have to get it “touched up”. 

With watercolor tattoos, however, you’ll probably just want to get them touched up sooner.


And now the hunt is on for an artist to make me one!!...and where to put it...and how many roses...do I want leaves? OH DEAR!
Wednesday, February 3, 2016

Crochet Baby High Heels

Anyone who knows me...knows my grand.~daughter must be fabulous...so last night I whipped up some baby stilettos for her...I  will update this post with the pattern soon...so keep checking back...


And here is my little Ballerina Princess...


Wednesday, January 20, 2016

Healthy fudgesicles


 Ingredients

  • 2 small ripe avocados
  • 1/4 cup cocoa powder
  • 1/3 cup  real maple syrup or honey  
  • 1 1/2 cups whole milk, or more as needed to blend
  • 1/2 tsp  real vanilla

Preparation

  1. Place everything into a blender and blend until smooth. You may need additional milk, depending on how thick you want your fudgesicles to be.
  2. Taste, and adjust ingredients (maple syrup, cocoa, etc) if necessary.
  3. Pour into popsicle molds and freeze until solid.

Wednesday, January 13, 2016

Pink re~styled Baby Levi Jeans

I found these cute 12 month Levi jeans for my granddaughter at the local thrift store.

I gave them a more boutique fashionable look by distressing them with a cheese grater  then adding some lace embellishments ...

I think they turned out ADORBS!


Thursday, December 24, 2015

No-Knead Rustic Dutch Oven Bread


No-Knead  Rustic Dutch Oven Bread Recipe

1/4 tsp active dry yeast
1 1/2 cups warm water
3 cups all-purpose flour, plus more for dusting. You may use white, whole wheat or a combination of the two.
1 1/2 tsp salt

 1 tsp. honey
Cornmeal or flour for dusting

Instructions:

1. In a large bowl, dissolve yeast in water. Add the flour and salt,and honey stirring until blended. The dough will be shaggy and sticky. Cover bowl with plastic wrap. Let the dough rest at least 8 hours, preferably 12 to 18, at warm room temperature, about 70 degrees.
2. The dough is ready when its surface is dotted with bubbles. Lightly flour a work surface and place dough on it. Sprinkle it with a little more flour and fold it over on itself once or twice. Cover loosely with plastic wrap and let it rest for about 15 minutes.
3. Using just enough flour to keep the dough from sticking to the work surface or to your fingers, gently shape it into a ball. Generously coat a clean dish towel with flour or cornmeal. Put the seam side of the dough down on the towel and dust with more flour. Cover with another towel and let rise for about 1 to 2 hours. When it’s ready, the dough will have doubled in size and will not readily spring back when poked with a finger.
4. At least 20 minutes before the dough is ready, heat oven to 475 degrees. Put a 6- to 8-quart heavy covered pot (cast iron, enamel, Pyrex or ceramic) in the oven as it heats. When the dough is ready, carefully remove the pot from the oven and lift off the lid. Slide your hand under the towel and turn the dough over into the pot, seam side up. The dough will lose its shape a bit in the process, but that’s OK. Give the pan a firm shake or two to help distribute the dough evenly, but don’t worry if it’s not perfect; it will straighten out as it bakes.Spritz with water lightly.
5. Cover and bake for 30 minutes. Remove the lid and bake another 15 to 20 minutes, until the loaf is beautifully browned. Remove the bread from the Dutch oven and let it cool on a rack for at least 1 hour before slicing.
Yield: One 1 1/2-pound loaf.


.